
7 - To Do App Part 1
It’s time to learn about a big concept in iOS, Core Data. Core Data is a framework that you use to manage the model layer objects in your application. It provides generalized and automated solutions to common tasks associated with object life cycle and object graph management, including persistence. You can read more on Core Data here. Core Data is a way to save data in an application locally (similar to a database).
We are going to create a To Do application in which we can create tasks and order them by priority and category. Let’s get started.
Project Creation
New > Project > Single Page App
I have named my app “DoItUp”. Make sure that Core Data is checked!
You’ll notice first off that there is a file that we havent seen before called
Data Models
For our To-do list we want to be able to create tasks: We want to be able to create tasks and set a title, description, priority, category, and optionally, an image.
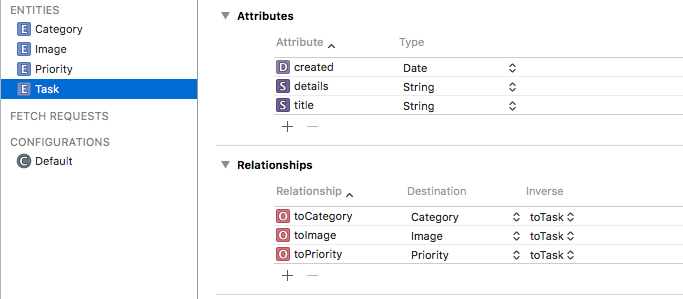
Create an entity by clicking the add-entity button in the bottom of the IDE window. Rename it “Task”. We can now add some attributes. With each attribute we name the attribute and give it a type. Here are the following entities and their attributes:
- Task {title: String, details: String, created: Date, due: Date}
- Image {image: Transformable}
- Category {category: String}
- Priority {priority: String}
Next we need to make some relationships. Relationships are the connections between two entities. It’s how we are going to link a Task to a Category and Priority and link Items to Tasks.
- Within Task: {toImage: Image, toPriority: Priority, toCategory: category}
- Within Image: {toTask: Task}
- Within Category: {toTask: Task}
- Within Priority: {toTask: Task}
You can set the inverse so that the return relationships are connected as well.
This is a quick look at our Task attributes and relationships just for a visual:
We can also change our editor style to view our core data models in a relational table view:
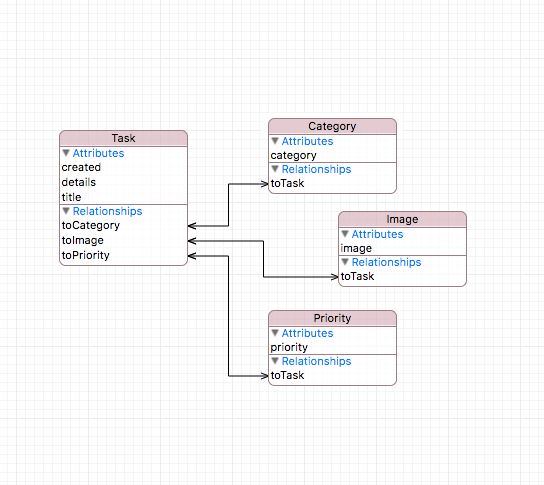
The one issue that we currently have is the type of relationships. By default all of these relations are “1 to 1” which means that We have one image per task, one category per task, and one priority per task which makes sense when looking from our Task model. From our category model, having one category per task doesn’t make sense. We should be able to have multiple tasks to one category. The same with priority. We can change these types of relationships in the right side pane of our IDE.
I changed my relations to have many tasks to one category and many tasks to one priority.
Designing the UI
Let’s tackle our Main.storyboard. Head to the file, select our initially created View Controller and go to Editor > Embed In > Navigation Controller. This generates a nice navigation controller connected to our View Controller.
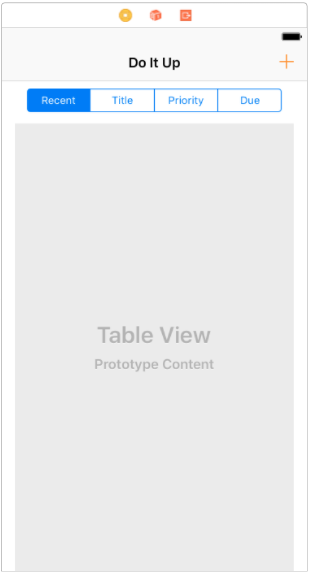
Focusing on our view controller let’s add:
- a bar button item
- title to the bar
- segmented control with 4 tabs
- table view
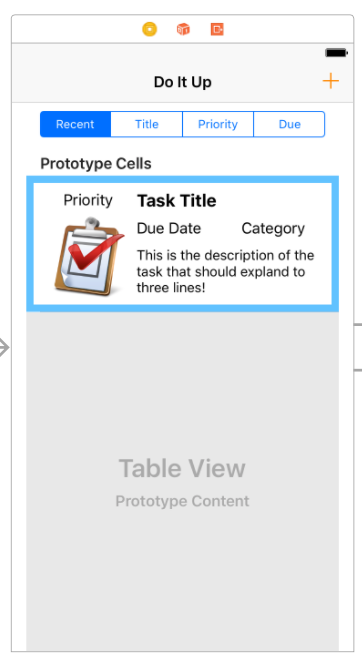
We have had a little practice with UI design for the past two apps so if you are confused on how to set constraints or general objects all together I suggest you check out the previous posts or other resources online. After adding these objects to our view controller this is what I currently have:
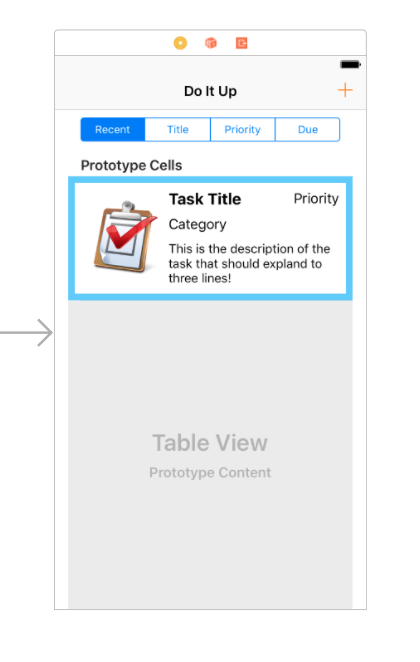
I have added all of my constraints to keep the items this way. We need to bring in a table cell to create a prototype for our task. Select our content view within our table view cell and its time to add some more objects:
- View Inside of our cell content area
- Image
- Label for title
- Label for priority
- Label for category
- Label for details
- Label for due date
I’m not going to walk through step by step on how to create this UI. I suggest experimenting with how you want it to look while figuring out what constraints you would like. For the purpose of moving forward, here is what mine looks like before I added a mock image to the UI:

And after a mock image with aspect fit content mode:
Switch some things around to incorperate due date:
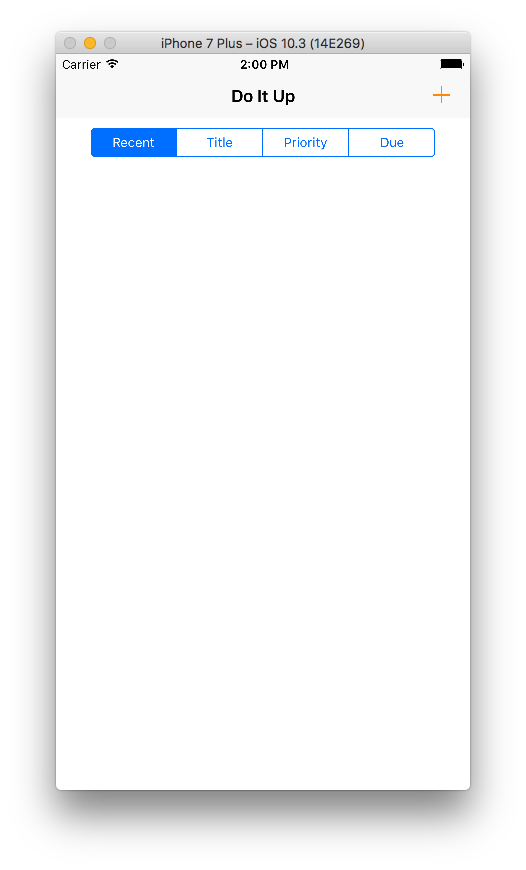
If we run our application, we aren’t going to see anything in the table view. So we now need to figure out how to create data and have our table view display it.
Creating Custom Table View Cell Class
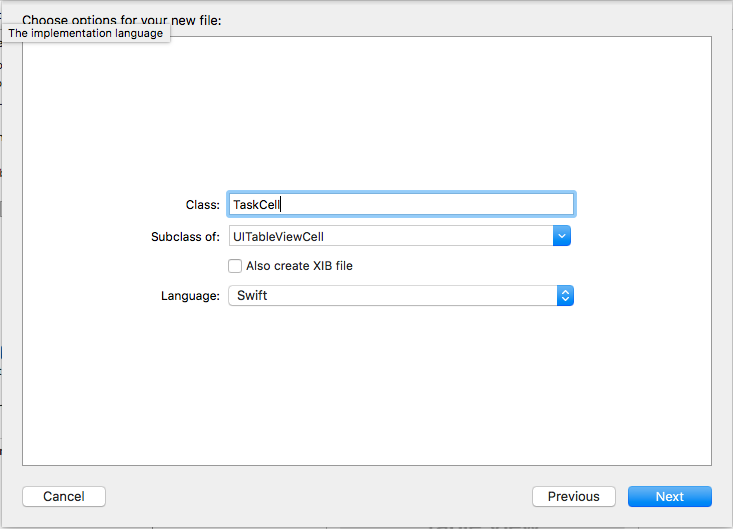
What we need to do is create a class for our cell so that we can reference and use to to display all of our data. Start by making a new Cocoa Touch Class of type UITableViewCell. I’m going to name it TaskCell:
We can delete the given code. To hook up our table view cell to our class, we change its class in Main.storyboard, similar to how we connect View Controllers to their respective files.
Now we are going to create IBOutlets in our TaskCell.swift file from our storyboard.
Our TaskCell.swift file should look like this at the moment:
import UIKit

class TaskCell: UITableViewCell {

    @IBOutlet weak var titleLabel: UILabel!
    @IBOutlet weak var categoryLabel: UILabel!
    @IBOutlet weak var detailLabel: UILabel!
    @IBOutlet weak var priorityLabel: UILabel!
    @IBOutlet weak var taskImage: UIImageView!
    @IBOutlet weak var dueDateLabel: UILabel!

}
Now we need to make IBOutlet connections in our original view controller. Connect the table view and the segmented controller. We also need to add some delegates and a data source. Remember that delegates are ways we control certain objects. Data source is another specification that we are going to get into. It describes where our data is coming from and how.
import UIKit

class ViewController: UIViewController, UITableViewDelegate, UITableViewDataSource {

    @IBOutlet weak var tableView: UITableView!
    @IBOutlet weak var segmentController: UISegmentedControl!

    override func viewDidLoad() {
        super.viewDidLoad()
        // Do any additional setup after loading the view, typically from a nib.
        tableView.delegate = self
        tableView.dataSource = self
    }

    override func didReceiveMemoryWarning() {
        super.didReceiveMemoryWarning()
        // Dispose of any resources that can be recreated.
    }

    func tableView(_ tableView: UITableView, cellForRowAt indexPath: IndexPath) -> UITableViewCell {

        return UITableViewCell()
    }

    func tableView(_ tableView: UITableView, numberOfRowsInSection section: Int) -> Int {
        return 0
    }

    func numberOfSections(in tableView: UITableView) -> Int {
        return 0
    }

}
This is boilerplate code at the moment to get rid of any errors that would be thrown by the lack of necessary functions of UITableViewDelegate and DataSource.
Fetch Requests and Controllers
Add the following to the top of the ViewController.swift file (the main view controller) and add the dependency in the class of ViewController:
import CoreData

class ViewController: UIViewController, UITableViewDelegate, UITableViewDataSource, NSFetchedResultsControllerDelegate {
NSFetchedResultsControllerDelegate is a mouthful, but its pretty much just a controller that allows to retreive (fetch) our data.
Go to our AppDelegate.swift file. As you can see there is some information provided about our Core Data Stack. I’m not going to get into the explanation on how the different pieces work, but a nice tip on how to learn more about the componenets that we are using is to use Command + Click on the word in our code. Here’s some of the info we get from NSFetchedResultsControllerDelegate:
/* Notifies the delegate that a fetched object has been changed due to an add, remove, move, or update. Enables NSFetchedResultsController change tracking.
    controller - controller instance that noticed the change on its fetched objects
    anObject - changed object
    indexPath - indexPath of changed object (nil for inserts)
    type - indicates if the change was an insert, delete, move, or update
    newIndexPath - the destination path of changed object (nil for deletes)
So our current task is to write a fetch controller. Before we do so, I’m going to add some shortcuts in our AppDelegate. According to our documentation (Command+Click), the app delegate works alongside the app object to ensure your app interacts properly with the system and with other apps. Specifically, the methods of the app delegate give you a chance to respond to important changes. For example, you use the methods of the app delegate to respond to state transitions, such as when your app moves from foreground to background execution, and to respond to incoming notifications. In many cases, the methods of the app delegate are the only way to receive these important notifications.
I’m going to add the following to the very bottom of the AppDelegate.swift file after the last closing brace:
let ad = UIApplication.shared.delegate as! AppDelegate
let context = ad.persistentContainer.viewContext
What this is doing is pretty much making our context for our core data accessible in our other files so we can call our context when we want to fetch/save/etc data.
Back in our main ViewController.swift, add in the following variable after our tableView and segmentController IBOutlets:
var fetchedResultsController: NSFetchedResultsController<Task>!
Now we add this function at the bottom of our view controller class before the last brace. I have incorperated comments to describe what each section of code is doing:
func attemptFetch() {
    // This is our request for getting our Tasks
    let request: NSFetchRequest<Task> = Task.fetchRequest()

    // This is one of our sorting mechanisms, by date using the created portion of our Task model
    let dateSort = NSSortDescriptor(key: "created", ascending: false)

    // setting our request to sort based on our date sort descriptor
    request.sortDescriptors = [dateSort]

    // we create a controller to house our request that can actually perform the request
    // we also pass in our context that we made accessible in our AppDelagate.swift
    let controller = NSFetchedResultsController(fetchRequest: request, managedObjectContext: context, sectionNameKeyPath: nil, cacheName: nil)

    // set the controllers delegate to listen to our stuff
    controller.delegate = self

    // make sure to set our global controller to our new fetch controller
    self.fetchedResultsController = controller

    do {
        // we try to perform a fetch
        try controller.performFetch()
    } catch {
        // if there is an error then we print it out
        let error = error as NSError
        print("\(error)")
    }
}
We now have a proper attemptFetch function. Let’s update some of our previous code. There’s a lot of boiler plate to get this working, but bear with me.
First go into Main.storyboard and change the reuse identifier for our task cell to something that we can use. Up until now there should have been a warning that we need one. I have named mine “taskCell”. Next update the following functions to have the proper bodies:
func tableView(_ tableView: UITableView, cellForRowAt indexPath: IndexPath) -> UITableViewCell {
    // make sure to set the reuse identifier for our cell, I have set mine to "taskCell"
    let cell = tableView.dequeueReusableCell(withIdentifier: "taskCell", for: indexPath) as! TaskCell
    configureCell(cell: cell, indexPath: indexPath as NSIndexPath)
    return cell
}

func tableView(_ tableView: UITableView, numberOfRowsInSection section: Int) -> Int {

    if let sections = fetchedResultsController.sections {
        let sectionInfo = sections[section]
        return sectionInfo.numberOfObjects
    }
    return 0

}

func numberOfSections(in tableView: UITableView) -> Int {
    if let sections = fetchedResultsController.sections {
        return sections.count
    }
    return 0
}

func tableView(_ tableView: UITableView, heightForRowAt indexPath: IndexPath) -> CGFloat {
        return 150
    }

func configureCell(cell: TaskCell, indexPath: NSIndexPath){
    // update cell
}
These are all functions that we previously put in as placeholder, but now we are filling it with some proper code. The only new functions that I slipped in was the “heightForRowAt” and “configureCell” function.
The height for row at function is there to make sure our cells don’t have differing heights based on the data that is passed in.
The configure cell function is there to make sure we are setting up our UI cells properly based on the data that is being passed in. Go to our TaskCell.swift and add the following functions to the class:
func configureCell(task: Task){
    titleLabel.text = task.title
    detailLabel.text = task.details
    titleLabel.adjustsFontSizeToFitWidth = true
    if(task.due != nil){
        dueDateLabel.text = dateString(date: (task.due?.description)!)
    }
    dueDateLabel.adjustsFontSizeToFitWidth = true


}

func dateString(date: String) -> String{
    let index = date.index(date.startIndex, offsetBy: 10)
    return date.substring(to: index)
}
Back to our ViewController.swift file and we can add some meat to our configureCell function:
func configureCell(cell: TaskCell, indexPath: NSIndexPath){

    let task = fetchedResultsController.object(at: indexPath as IndexPath)
    cell.configureCell(task: task)
}
Now let’s add three more functions to our main ViewController.swift to get this thing working:
func controllerWillChangeContent(_ controller: NSFetchedResultsController<NSFetchRequestResult>) {
    tableView.beginUpdates()
}

func controllerDidChangeContent(_ controller: NSFetchedResultsController<NSFetchRequestResult>) {
    tableView.endUpdates()
}

func controller(_ controller: NSFetchedResultsController<NSFetchRequestResult>, didChange anObject: Any, at indexPath: IndexPath?, for type: NSFetchedResultsChangeType, newIndexPath: IndexPath?) {

    // this will deal with all of the possible changes to our results
    switch(type) {

    case.insert:
        if let indexPath = newIndexPath {
            tableView.insertRows(at: [indexPath], with: .fade)
        }
        break

    case.delete:
        if let indexPath = indexPath {
            tableView.deleteRows(at: [indexPath], with: .fade)
        }
        break

    case.update:
        if let indexPath = indexPath {
            let cell = tableView.cellForRow(at: indexPath) as! TaskCell
            configureCell(cell: cell, indexPath: indexPath as NSIndexPath)
        }
        break

    case.move:
        if let indexPath = indexPath {
            tableView.deleteRows(at: [indexPath], with: .fade)
        }
        if let indexPath = newIndexPath {
            tableView.insertRows(at: [indexPath], with: .fade)
        }
        break
    }
}
Here’s what these functions do:
- ControllerWillChangeContext: when the controller is going to change the content, the tableView is going to consider possible updates
- ControllerDidChangeContent: when the controller has changed then the tableView doesn’t need to consider updates anymore
- When objects change for the controller (the large controller function):
- We need to consider the possible change types:
- Insert: we let the indexPath of be the newIndexPath and insert rows in the table. We add .fade for effect.
- Delete: we consider the current indexPath and delete the row there
- Update: we consider the current index path, and we configure our cell with the indexPath given
- Move: We delete the cell at the current Index path and insert it at the new index path
- We need to consider the possible change types:
This is some complicated stuff we just did. But if all went smoothly, then We should be able to run our app:
Putting In Test Data
It’s pretty easy to put in test data to see how we like our cell set up and what not:
Add this function at the end of the ViewController.swift class:
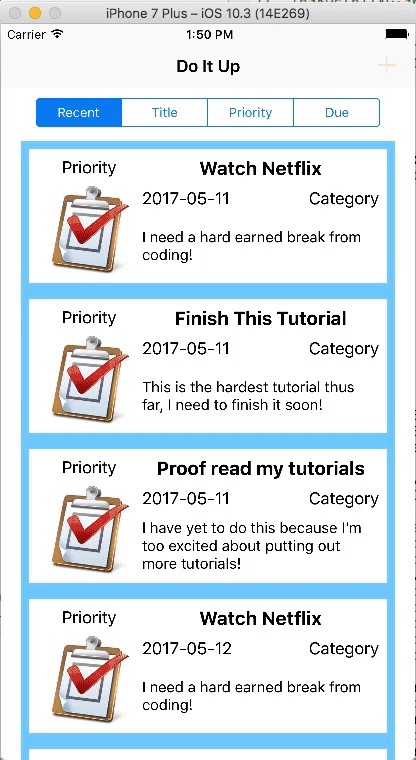
func generateTestData() {
    let task = Task(context: context)
    task.title = "Finish This Tutorial"
    task.details = "This is the hardest tutorial thus far, I need to finish it soon!"

    let task2 = Task(context: context)
    task2.title = "Proof read my tutorials"
    task2.details = "I have yet to do this because I'm too excited about putting out more tutorials!"

    let task3 = Task(context: context)
    task3.title = "Watch Netflix"
    task3.details = "I need a hard earned break from coding!"
}
We are simply creating three tasks in our context! Add the following line in our viewDidLoad() before attemptFetch();
// add this line before attemptFetch()
generateTestData()
Run and it’s beautiful:
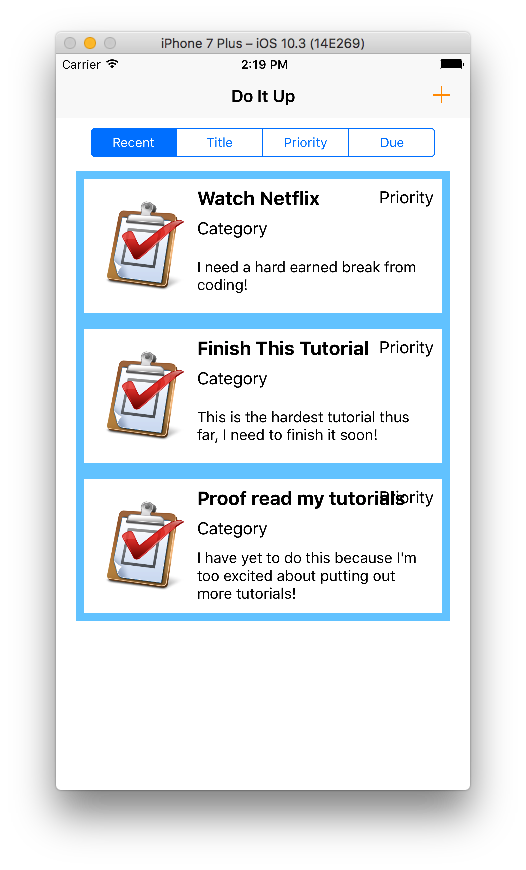
This is after I fixed some issues with my date:
Ok maybe there are some UI things that need to be worked out, but let’s stick to the core data part of it and try to fix the UI on your own if there is anything you see wrong (like my title overlapping the priority).
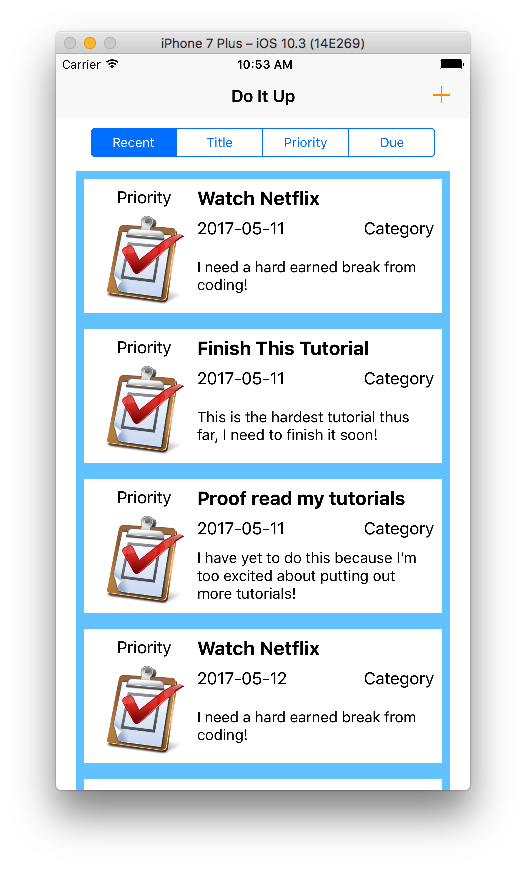
If you notice however, if you remove the function to generate test data from our viewDidLoad() the data dissapears along with it. We want it to stay! So we need to save our context.
Simply add the following to our generateTestData() at the end:
ad.saveContext()
This is after I fixed some issues with my date:
Adding New Tasks
It is at this point during the tutorial that I realized I have not been adding in the components to add a due date to our tasks. So I’ll leave that up to you guys as an extra credit assignment ;)
I’m going to organize my files into some folders so that we can start adding some complexity. We want to add a new View Controller that’s going to handle adding tasks.
New > File > CocoaTouch Class
I named mine TaskDetailVC of type UIViewController.
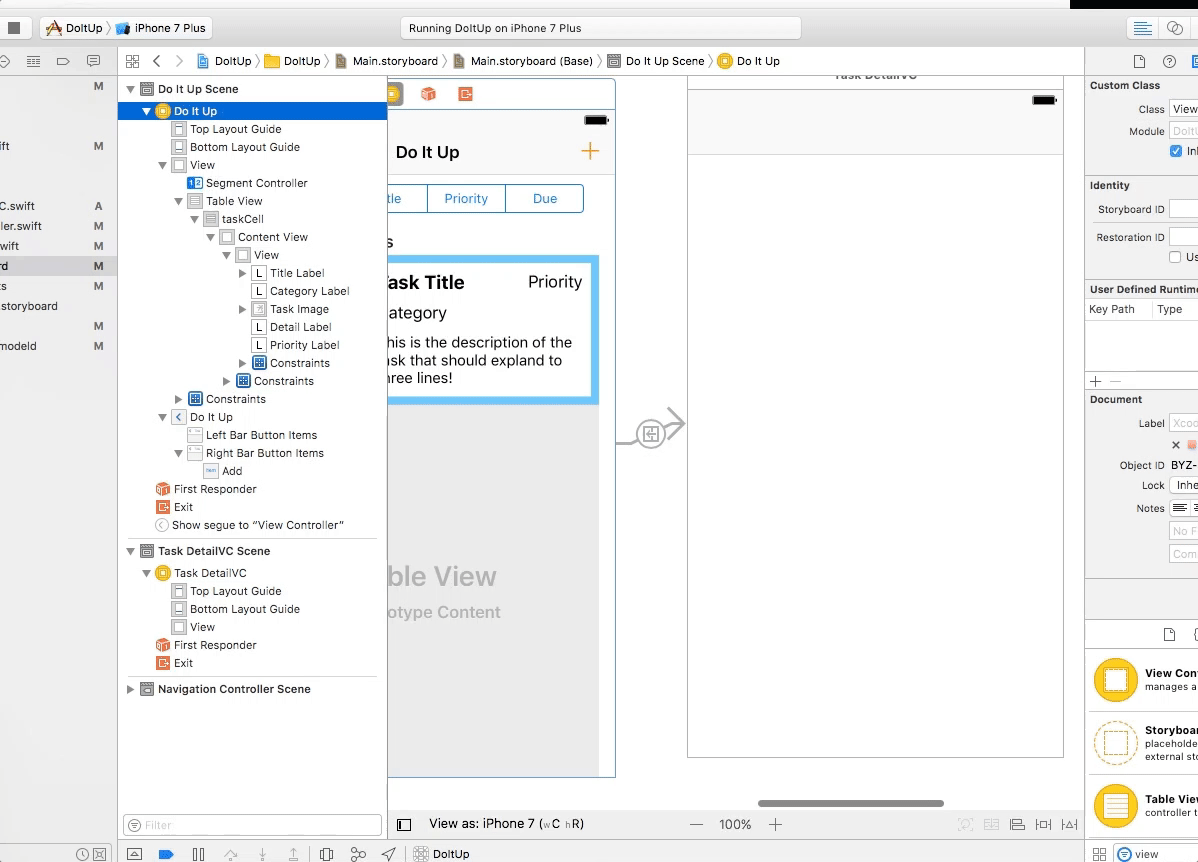
In our Main.storyboard, create a new view controller and connect our plus button to it with a show seque:
Don’t forget to set the class of our new view controller to TaskDetailVC in the Identity Inspector.
Create a second seque from the main view controller itself to our Task Detail scene:
The goal of this page is to be where the user can input all of the data they want for their task. The title, description, image, category, priority, and due date.
Time to add objects to our Task Detail Scene:
- Place an image view and a button, have them be a square (mine is 120 by 120). Also make sure they are overlapping. You can select both items and align them to have the same horizontal and vertical positioning. Also get rid of the button text.
- Add two text fields, one to take in title and one to take in description. Make sure the description has more room than the title.
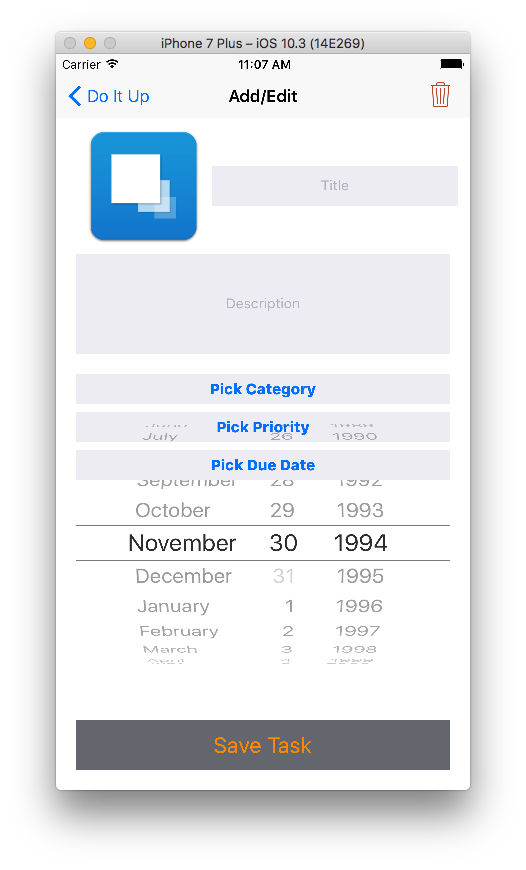
- Add three buttons, one that specifies to pick a category, another that specifies to pick a priority, and one last one to pick a date.
- This is a little complicated: add two picker views and one date picker. Layer them on top of eachother. We are going to have them initially hidden from the view, and then when we hit our button we are going to have them appear to let the user pick. Having them overlapping over items on the view is not a problem in this case.
- Add a navigation item to allow a title, and add a trash can as a bar button in the top right of our nav bar
- Add one last button for the selection, I placed mine in line with the description field.
After adding in all of the constraints and some coloring/bolding. This is what we have:
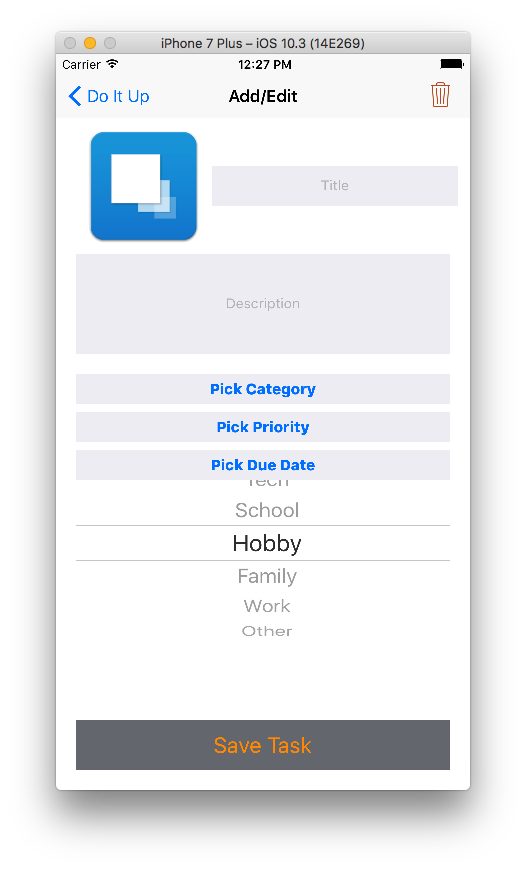
It seems like a lot of craziness but it will all make sense soon. Here’s what the page looks like when ran (the picker views disappear because theres no data in them at the moment):
Programatically Connecting Add/Edit View to TaskDetailVC
Let’s create IBOutlets for every item on our board shall we. We also need to extend UIPickerViewDataSource and UIPickerViewDelegate to get our picker views working. Once we extend them we will have some errors, so we need to include the appropriate functions to remove the errors.
import UIKit

class TaskDetailVC: UIViewController, UIPickerViewDelegate, UIPickerViewDataSource {
    @IBOutlet weak var taskImage: UIImageView!
    @IBOutlet weak var titleField: UITextField!
    @IBOutlet weak var detailField: UITextField!
    @IBOutlet weak var pickCategoryButton: UIButton!
    @IBOutlet weak var pickPriorityButton: UIButton!
    @IBOutlet weak var pickDueDateButton: UIButton!
    @IBOutlet weak var categoryPickerView: UIPickerView!
    @IBOutlet weak var priorityPickerView: UIPickerView!
    @IBOutlet weak var datePicker: UIDatePicker!
    @IBOutlet weak var selectButton: UIButton!

    override func viewDidLoad() {
        super.viewDidLoad()

        // Do any additional setup after loading the view.
    }

    override func didReceiveMemoryWarning() {
        super.didReceiveMemoryWarning()
        // Dispose of any resources that can be recreated.
    }

    func pickerView(_ pickerView: UIPickerView, titleForRow row: Int, forComponent component: Int) -> String? {


    }
    func pickerView(_ pickerView: UIPickerView, numberOfRowsInComponent component: Int) -> Int {

    }
    func pickerView(_ pickerView: UIPickerView, didSelectRow row: Int, inComponent component: Int) {

    }
    func numberOfComponents(in pickerView: UIPickerView) -> Int {

    }
}
Now this is the interesting part. We have two picker views that we want to have different data. This means that we need to somehow seperate the picker views based on their identity or “tag”. Go to Main.storyboard and make our category picker view have a tag of 1 and our priority picker view a tag of 2. You can do so in the attributes inspector.
Now back in our TaskDetailVC.swift we want to fill in these functions with if statements on our tag values. We also want the UI to incorperate the opening and closing of these picker views. Here is all of the logic now in TaskDetailVC.swift:
We want to import core data:
...
import UIKit
import CoreData
...
We want to create empty arrays that are going to load our categories and priorities:
... // Within our TaskDetailVC Class ...
var categories = [Category]()
var priorities = [Priority]()
var categoryIsBeingPicked = false
var priorityIsBeingPicked = false
var dueDateIsBeingPicked = false
We want to create two functions that are going to get our categories and priorities from core data, similar to how we got our tasks:
func getCategories() {
    let request:NSFetchRequest<Category> = Category.fetchRequest()

    do {
        self.categories = try context.fetch(request)
        self.categoryPickerView.reloadAllComponents()
    } catch {
        // handle the error
    }
}

func getPriorities() {
    let request:NSFetchRequest<Priority> = Priority.fetchRequest()
    do {
        self.priorities = try context.fetch(request)
        self.priorityPickerView.reloadAllComponents()
    } catch {
        // handle the error
    }
}
We are going to deal with the initial delegates and data sources of the picker views within our viewDidLoad, along with the initial hidden pickers and the categories and priorities that we want to be instantiated in core data:
override func viewDidLoad() {
    super.viewDidLoad()

    // Do any additional setup after loading the view.
    categoryPickerView.isHidden = true
    priorityPickerView.isHidden = true
    datePicker.isHidden = true
    selectButton.isHidden = true
    categoryPickerView.delegate = self
    priorityPickerView.delegate = self
    categoryPickerView.dataSource = self
    priorityPickerView.dataSource = self

    let category1 = Category(context: context)
    category1.category = "Work"
    let category2 = Category(context: context)
    category2.category = "School"
    let category3 = Category(context: context)
    category3.category = "Hobby"
    let category4 = Category(context: context)
    category4.category = "Family"
    let category5 = Category(context: context)
    category5.category = "Tech"
    let category6 = Category(context: context)
    category6.category = "Other"

    let priority1 = Priority(context: context)
    priority1.priority = "High"
    let priority2 = Priority(context: context)
    priority2.priority = "Medium"
    let priority3 = Priority(context: context)
    priority3.priority = "Low"
    let priority4 = Priority(context: context)
    priority4.priority = "None"

    getCategories()
    getPriorities()
}
We want to deal with the logic of our buttons and what happens when we select and are done with selection:
@IBAction func selectPressed(_ sender: Any) {
    if(!selectButton.isHidden){
        if(categoryIsBeingPicked){
            // set the button of category to what is selected
            pickCategoryButton.setTitle(categories[categoryPickerView.selectedRow(inComponent: 0)].category, for: .normal)

            // hide and show items again
            categoryPickerView.isHidden = true
            selectButton.isHidden = true
            pickCategoryButton.isHidden = false
            pickPriorityButton.isHidden = false
            pickDueDateButton.isHidden = false
            detailField.isHidden = false
            categoryIsBeingPicked = false
        } else if(priorityIsBeingPicked){
            // set the button of priority to what is selected
            pickPriorityButton.setTitle(priorities[priorityPickerView.selectedRow(inComponent: 0)].priority, for: .normal)


            // hide and show items again
            priorityPickerView.isHidden = true
            selectButton.isHidden = true
            pickCategoryButton.isHidden = false
            pickPriorityButton.isHidden = false
            pickDueDateButton.isHidden = false
            detailField.isHidden = false
            priorityIsBeingPicked = false
        } else if(dueDateIsBeingPicked) {
            // set the button of due date to what is selected
            pickDueDateButton.setTitle(datePicker.date.description, for: .normal)

            // hide and show items again
            datePicker.isHidden = true
            selectButton.isHidden = true
            pickCategoryButton.isHidden = false
            pickPriorityButton.isHidden = false
            pickDueDateButton.isHidden = false
            detailField.isHidden = false
            dueDateIsBeingPicked = false
        }
    }
}

@IBAction func pickCategoryPressed(_ sender: Any) {
    categoryPickerView.isHidden = false
    selectButton.isHidden = false
    pickCategoryButton.isHidden = true
    pickPriorityButton.isHidden = true
    pickDueDateButton.isHidden = true
    detailField.isHidden = true
    categoryIsBeingPicked = true
}
@IBAction func pickPriorityPressed(_ sender: Any) {
    priorityPickerView.isHidden = false
    selectButton.isHidden = false
    pickCategoryButton.isHidden = true
    pickPriorityButton.isHidden = true
    pickDueDateButton.isHidden = true
    detailField.isHidden = true
    priorityIsBeingPicked = true
}

@IBAction func pickDatePressed(_ sender: Any) {
    datePicker.isHidden = false
    selectButton.isHidden = false
    pickCategoryButton.isHidden = true
    pickPriorityButton.isHidden = true
    pickDueDateButton.isHidden = true
    detailField.isHidden = true
    dueDateIsBeingPicked = true
}
Lastly we fill in the required functions with proper tag usage:
func pickerView(_ pickerView: UIPickerView, titleForRow row: Int, forComponent component: Int) -> String? {
    if pickerView.tag == 1 {
        let category = categories[row]
        return category.category
    } else {
        let priority = priorities[row]
        return priority.priority
    }

}
func pickerView(_ pickerView: UIPickerView, numberOfRowsInComponent component: Int) -> Int {
    if pickerView.tag == 1 {
        return categories.count
    } else {
        return priorities.count
    }

}
func pickerView(_ pickerView: UIPickerView, didSelectRow row: Int, inComponent component: Int) {


}
func numberOfComponents(in pickerView: UIPickerView) -> Int {
    return 1

}
After all of this, we have the following:
Check out the next tutorial for the rest of this project!